classSnode{ constructor(val,next = null){ this.data = val this.next = next } } classDnode{ constructor(val, perv = null, next = null){ this.data = val this.next = next this.prev = perv } } // test case let head = new Snode(null) let node = head for(let val of [1,2,3,4,5]){ console.log(val) node.next = new Snode(val) node = node.next } head = head.next // constructed test case
const dhead = new Dnode(head.data) let point = head let dpoint = dhead while(point.next){ dpoint.next = new Dnode(point.next.data, dpoint, null)
point = point.next dpoint = dpoint.next } console.log(dhead)
functionnearThreeSumary(arr, target) { arr.sort((a, b) => (a - b)) let distance = Number.MAX_VALUE res = [] for (let i = 0; i < arr.length-3; i++) { let left = i + 1 let right = arr.length - 1 while (left < right) { const sum = arr[i] + arr[left] + arr[right] if (Math.abs(target - sum) < distance) res = [arr[i], arr[left], arr[right]] distance = target - sum console.log([arr[i], arr[left], arr[right]], sum) if (target > sum) { left++ } elseif (target < sum) { right-- } else { return res } } } return res }
we highly recommend declaring defaultMessages inline along with their usages because of the following reasons: 建议使用声明内联的defaultMessages, 连同他们的usage,原因如下
Messages colocated with their usages become self-managed, as their usages change/removed, so are the messages. 搭配usage的Message成为自治的 当usage更改或移除,Message亦同
Messages are highly contextual. We’ve seen a lot of cases where developers assume a certain grammar when they write their messages. Buttons/Call-To-Actions and labels are also translated differently. Message高度关联上下文, 杜绝为message发明新语法或编规则
Text styling is also dependent on the message itself. Things like truncation, capitalization… certainly affect the messages themselves. 会与样式相关
Better integrations with toolchains. Most toolchains cannot verify cross-file references to validate syntax/usage. 易于工具链集成
格式化语法
1 2 3 4 5 6 7 8 9 10 11 12 13 14
import * as React from 'react' import {IntlProvider, FormattedMessage, FormattedNumber} from 'react-intl'
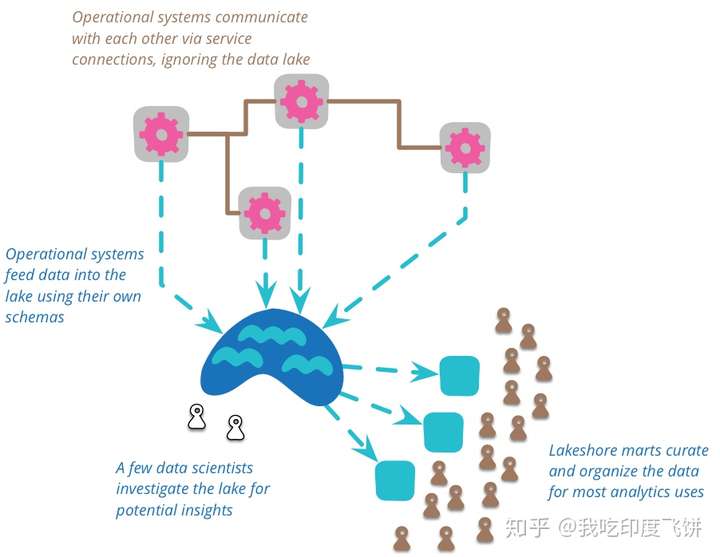
Azure Data Lake includes all the capabilities required to make it easy for developers, data scientists, and analysts to store data of any size, shape, and speed, and do all types of processing and analytics across platforms and languages. It removes the complexities of ingesting(插入) and storing all of your data while making it faster to get up and running with batch(批量), streaming, and interactive analytics. ———— Azure Data Lake Solution
// Custom Theming for Angular Material
// For more information: https://material.angular.io/guide/theming
@import '~@angular/material/theming';
// Plus imports for other components in your app.
@import 'theme.scss';
// Include the common styles for Angular Material. We include this here so that you only
// have to load a single css file for Angular Material in your app.
// Be sure that you only ever include this mixin once!
@include mat-core();

// Define the palettes for your theme using the Material Design palettes available in palette.scss
// (imported above). For each palette, you can optionally specify a default, lighter, and darker
// hue. Available color palettes: https://material.io/design/color/
$CSDPartnerPortal-primary: mat-palette($csd2021);
$CSDPartnerPortal-accent: mat-palette($csd2021, 500, A100, A400);

// The warn palette is optional (defaults to red).
$CSDPartnerPortal-warn: mat-palette($mat-red);

// Create the theme object. A theme consists of configurations for individual
// theming systems such as "color" or "typography".
$CSDPartnerPortal-theme: mat-light-theme((
  color: (
    primary: $CSDPartnerPortal-primary,
    accent: $CSDPartnerPortal-accent,
    warn: $CSDPartnerPortal-warn,
  )
));

// Include theme styles for core and each component used in your app.
// Alternatively, you can import and @include the theme mixins for each component
// that you are using.
@include angular-material-theme($CSDPartnerPortal-theme);