xss攻击
https+ssl
xss攻击
https+ssl
美术建模减面
Draco压缩库
LOD技术(Levels of Detail)是一种以空间换时间的优化方法,场景中加入LOD控制的、通过摄像机距离决定是否显示的不同细节模型
1 | const lod = new THREE.LOD(); |
Model:RoBERTa 来源:Huggingface
1 | import os |
Model: BART
1 | from transformers import AutoTokenizer |
NLP 常用任务:
ner:命名实体识别,提取人名、地名、组织名
CV & 音频常用任务:
image-classification:图像分类。
Trainer类 封装Forward, Backward, Optimizer_step, Zero_grad迭代过程
训练数据集 DataSet 在huggingface上的另一大类资源
利用Dateset微调llm
fk vs ik (反向控制)
Regify
1 | pip install jupyter |
制造业:工资↑,生产率↑↑ → 成本 ↓(东西越来越便宜)
服务业:工资↑,生产率→(不变) → 成本↑↑(服务越来越贵)
这就是为什么你现在买一台高端电脑(制造品)的价格可能和20年前差不多(甚至更便宜),但看一场病、请个家教、修个水管的价格却贵得离谱。随着社会越来越富裕,我们花在“买服务”上的钱占比会越来越高,感觉越来越“穷”。
这描述的是国民收入这块“大蛋糕”里,切给“劳动”的部分越来越少,切给“资本”的部分越来越多的现象。
技术进步让机器和软件(资本品)变得极其便宜且高效, AI作为一种新型资本,正在大规模替代“认知型劳动” 降本增效的过程中,造成劳动者与资本家之间贫富差距扩大,财富集中的同时也造成了消费不足
鲍莫尔成本病解释了为什么服务越来越贵,且服务业吸纳了那么多就业
劳动份额下降解释了为什么打工人虽然辛苦,但分到的钱却越来越少。
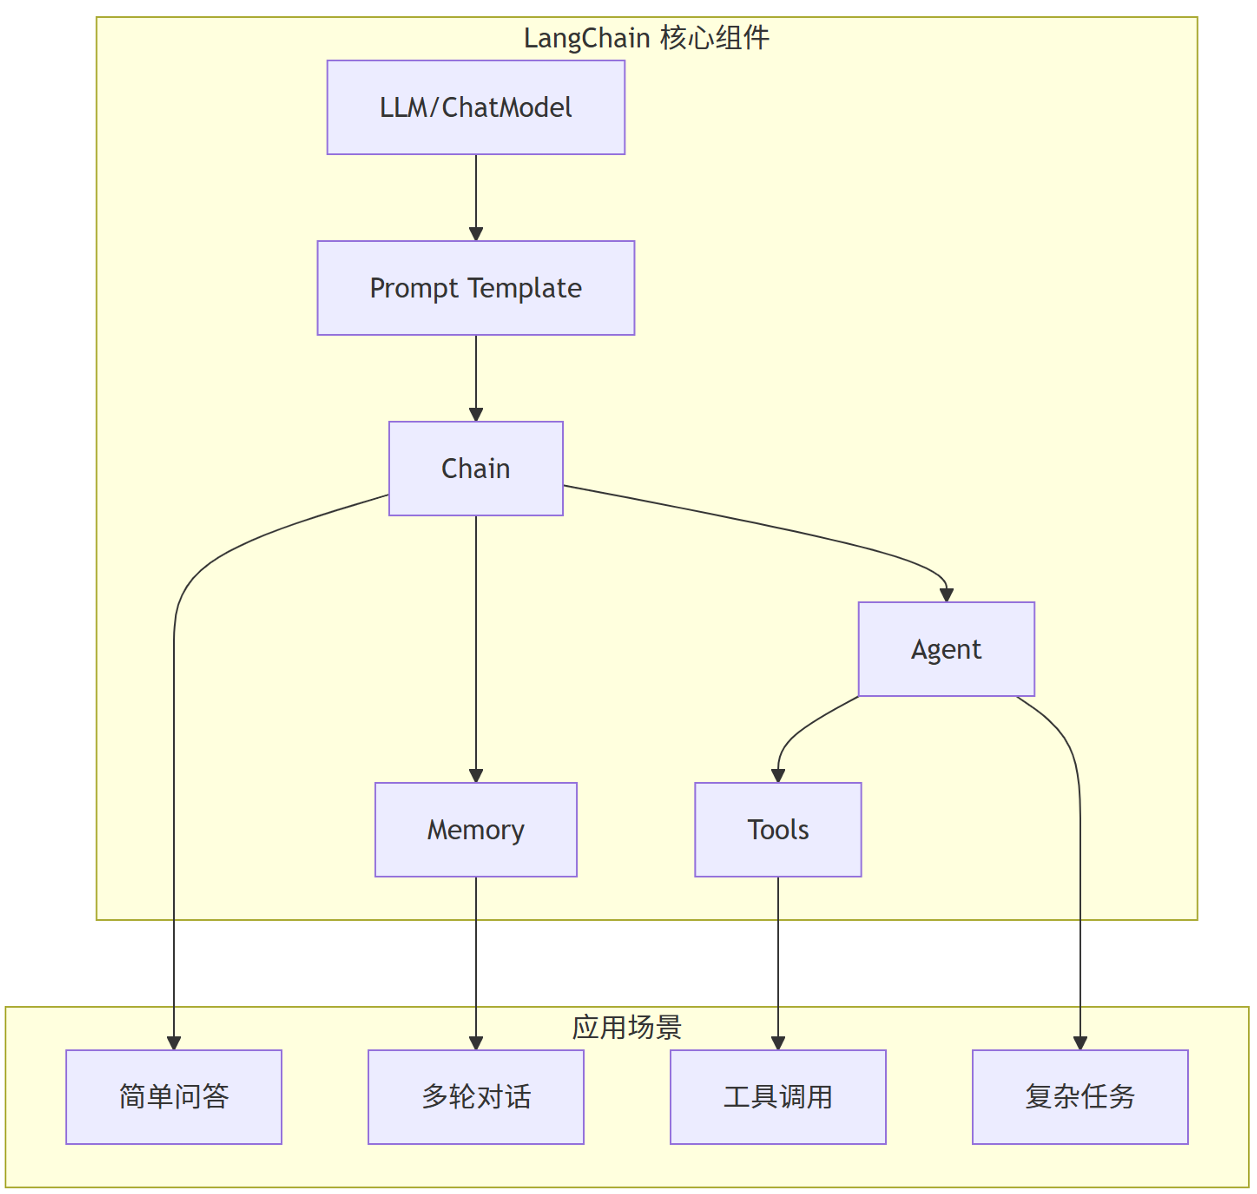
langchain是python语言的AI应用开发工具箱,封装并提供 提示词模板、主流LLM api、保存对话上下文等功能的标准化接口 让开发者无需从零搭建复杂架构, 从而快速构建具备“思考、记忆、行动”能力的agent
安装:
1 | pip install langchain |
显示版本1.0(2025年10月发布)以上 与0.3有较大改版, 新增子项目:

1 | cd AgentProj |
将环境变量写入项目下的.env文件
1 | DEEPSEEK_API_KEY='xxxxx' |
loadenv并调用os.getenv
1 | from dotenv import load_dotenv |
注意到langchain-openai是langchain的扩展包 使用下面的安装命令效果相同
1 | pip install -U "langchain[openai]" |
更多模型提供商: Official Providers 其实国内外各种大模型都可以直接使用“ChatOpenAI”类来负责调用
1 | from langchain_openai import ChatOpenAI |
content=’我是DeepSeek,由深度求索公司创造的AI助手!😊 \n\n看着你的眼睛(虽然我没有物理形态),我可以告诉你:\n- 我是一个纯文本AI模型,擅长理解和生成文字内容\n- 拥有128K的上下文处理能力\n- 支持文件上传功能(图像、文档等)\n- 完全免费使用,没有语音功能\n- 知识截止到2024年7月\n\n我的“眼睛”就是我的文字理解能力,能通过你上传的文件“看到”其中的文字信息。有什么问题想要探讨吗?我很乐意帮助你!✨’ additional_kwargs={‘refusal’: None} response_metadata={‘token_usage’: {‘completion_tokens’: 119, ‘prompt_tokens’: 13, ‘total_tokens’: 132, ‘completion_tokens_details’: None, ‘prompt_tokens_details’: {‘audio_tokens’: None, ‘cached_tokens’: 0}}, ‘model_provider’: ‘openai’, ‘model_name’: ‘deepseek-v3.2’, ‘system_fingerprint’: None, ‘id’: ‘chatcmpl-86738849-2401-9a6d-903e-8234934d2197’, ‘finish_reason’: ‘stop’, ‘logprobs’: None} id=’lc_run—019c22e8-e465-7f92-acdd-25b2d4a42e44-0’ tool_calls=[] invalid_tool_calls=[] usage_metadata={‘input_tokens’: 13, ‘output_tokens’: 119, ‘total_tokens’: 132, ‘input_token_details’: {‘cache_read’: 0}, ‘output_token_details’: {}}
DeepSeek有专门的扩展 langchain_deepseek
type(response)将显示返回类型为AIMessage 在这个结构中显示总token消耗是132 与百炼控制台计费数据一致
1 | from langchain_deepseek import ChatDeepSeek |
ChatDeepSeek返回的AIMessage中 包含reasoning_content(深度思考)
QQs按:invoke没有参数控制是否输出reasoning_content, 也就是说 官网聊天窗口的‘深度思考’开关是一个模型切换功能
社区集成
langchain-community:官方维护的社区集成包 包含了数十甚至上百个第三方模型的集成(通义千问、文心一言、Moonshot、各类向量数据库等)
1 | import os |
流式输出
1 | for chunk in llm.stream("怎么才能暴富") |
chunk类型是AIMessageChunk 内容是逐个token(可能是一个字、词、标点符号, 取决于大模型分词器)返回的
1 | # 创建Prompt Template |
为什么python支持类似shell命令行的管道语法? 其实这是利用了 Python 的 运算符重载。
| 在 Python 内部对应 __or__ 方法。ChatPromptTemplate, ChatOpenAI, StrOutputParser)都实现了这个方法。A | B 时,Python 实际上在后台执行 A.__or__(B)。__or__ 方法里做的事情就是:把 B 包装起来,存进 A 的属性里,形成一棵调用树。.invoke() 时,这棵树才开始遍历执行,数据顺着树枝从根部流向末梢。1 | # v0.3 写法 |
1 | from langchain.agents import create_agent |
主流联网搜索工具 可以让大模型突破训练数据时效的限制 检索互联网
1 | from langchain_community.agent_toolkits.load_tools import load_tools |
1 | # 使用@tool装饰器自定义一个工具 |
匹配提示词中的数字和运算符 计算结果
QQs按: 需记得能被llm接收的只有prompt,对于支持工具调用的llm,prompt会重新组装,并多次调用,首先提交的prompt告诉llm有以下工具可以调用,根据用户提问让llm判断是否使用、使用哪些工具,如果llm决定调用,要再提交一次包含工具调用结果的prompt并要求llm将工具调用结果整合到回答中
容错处理(暂略)
Reason + Action 就是让 LLM 像人类一样思考:先观察问题,推理出需要做什么动作,执行动作(调用工具),观察结果,最后得出结论
before/after钩子
Youtube 视频、音频 -> Y2mate
bilibili等多平台 -> SnapAny
1 | # windows bash 安装 |
视频截取
1 | ffmpeg -i input.mp4 -ss 00:00:10 -to 00:00:20 -c copy output.mp4 |
图片批量截取
1 | pip install Pillow |
clips.py1
2
3
4
5
6
7
8
9
10
11
12
13
14
15
16
17
18
19
20
21
22
23
24
25
26
27
28
29
30
31
32
33
34
35
36
37
38
39
40
41
42
43
44
45
46
47import os
from PIL import Image
# 配置参数
input_dir = '.' # 输入目录,'.' 表示当前目录
output_dir = 'output' # 输出子目录名
# 截取区域 (左, 上, 右, 下)
# 注意:Pillow 的坐标系统原点(0,0)在左上角
crop_box = (1254, 104, 1798, 888)
def main():
# 如果输出目录不存在,则创建
if not os.path.exists(output_dir):
os.makedirs(output_dir)
print(f"创建输出目录: {output_dir}")
# 获取目录下所有文件
files = os.listdir(input_dir)
png_files = [f for f in files if f.lower().endswith('.png')]
count = 0
for filename in png_files:
input_path = os.path.join(input_dir, filename)
try:
# 打开图片
with Image.open(input_path) as img:
# 截取指定区域
cropped_img = img.crop(crop_box)
# 构造输出路径
output_path = os.path.join(output_dir, filename)
# 保存图片
cropped_img.save(output_path)
print(f"处理完成: {filename}")
count += 1
except Exception as e:
print(f"处理 {filename} 时出错: {e}")
print(f"\n全部完成!共处理 {count} 张图片。")
if __name__ == '__main__':
main()
流程化
视频结构:老套的开篇叙事 重点字幕 音效 转场
视频剪辑工作流 to be continued
目录
1 | web-3d-cli/ |
npm link
npm link 是一个用于本地包开发与调试的强大工具,它通过创建符号链接,让你在不发布到 npm 仓库的情况下,将本地开发的包直接在其他项目中使用,实现代码的实时同步更新。
1 | cd /path/to/my-package |
npm publish
1 |